If you plan on completing Subnautica 2’s storyline, you’ll eventually need to venture out into boiling hot, volcanic regions of the game’s oceans to acquire uncommon resources. Unfortunately for us, we’re not invincible, and we need to develop heat tolerance before exploring beyond the map’s starting area.
Table of contents
How to unlock Heat Tolerance in Subnautica 2
Withstanding the heat within Subnautica 2’s volcanic ocean biome requires unlocking the Heat Tolerance from an Angel Comb bulb after crafting a Sonic Resonator. You’ll need to use your Sonic Resonator to clear away bloom infestation surrounding the Angel Comb and it’s juvenile offspring, allowing its bulb to appear for you to claim.
How to make a Sonic Resonator
Your first step before venturing beyond this point is to craft a Sonic Resonator. You’ll need to scan two of them in the ocean to unlock its respective blueprint. The easiest way to find them is to travel 300 meters north of the Lifepod to the Old Habitat POI. There are also a few near the Heat Tolerance Angel Combs, particularly inside a metal crate near the Spider Dome POI 240 meters southwest of the Lifepod.
Once you scan all of its blueprint components, you’ll need the following materials to craft it:
- Basic Battery (1)
- Titanium Ingot (2)
- Lead (2)
- Wiring Kit (1)
Basic batteries are the easiest to create, requiring two copper and one Acidic Raion Pouch to make. You’ll find both materials in caves surrounding the Lifepod when you first start.
Titanium ingots are slightly trickier to make, as you’ll need to get your hands on a processor. The fastest way to unlock it is to visit the Old Habitat 300 meters north of the Lifepod and scanning the broken processors within its ruins. From here, you can build the machine, stick three titanium in per ingot, and wait a minute for them to process.
Obtaining lead requires you to explore beyond the Lifepod’s immediate starting area. You’ll mainly find it in caves near the Old Habitat and the nearby Camp One POI. There are multiple ravines and overhangs around these POIs that house multiple lead ore nodes.
Last but not least is a wiring kit, which you can make using copper wire and one silver. Similar to lead, you can find silver near the Old Habitat and inside the Chap Blackbox cave 220 meters south of the Lifepod.
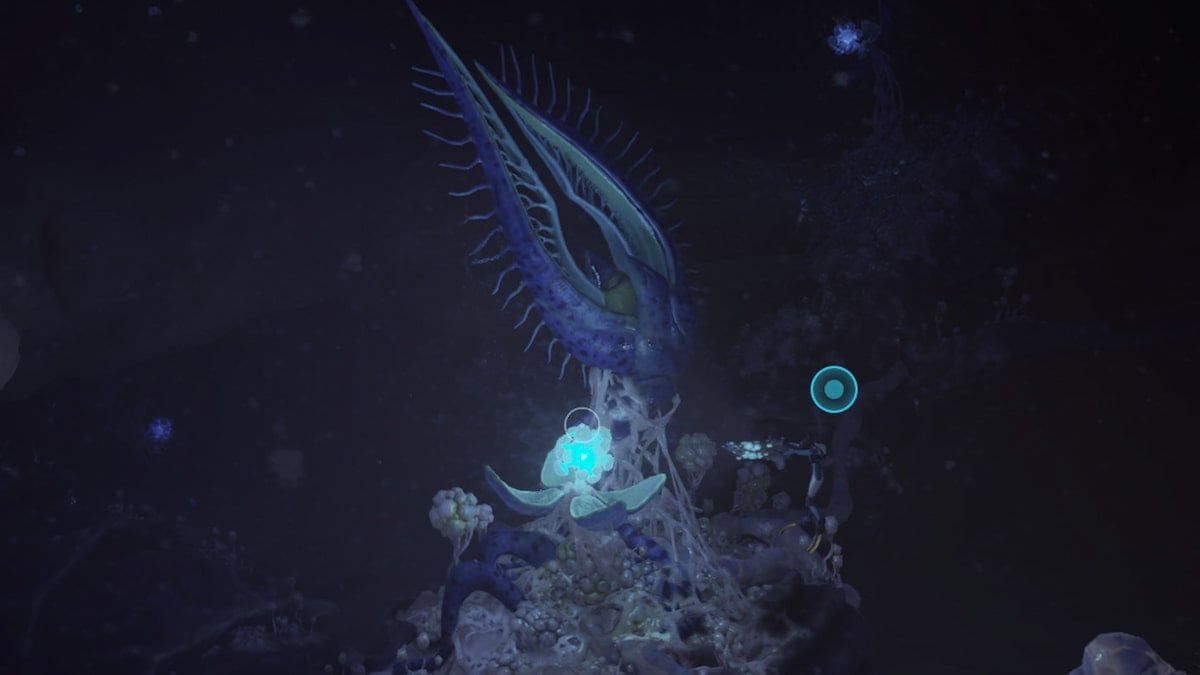
Angel Comb Bloom Infestation puzzle solution in Subnautica 2
You’ll need to explore three separate locations while tackling the Heat Tolerance Angel Comb’s Bloom Infestation puzzle.
- Adult Angel Comb: 200 meters northwest of the Lifepod at the Angel Comb POI
- First Juvenile Angel Comb: 240 meters southwest of the Lifepod at the Spider Dome POI
- Second Juvenile Angel Comb: 140 meters northeast of the Adult Angel Comb, 240 meters north-northwest of the Lifepod.
The main POI you’ll need to return to is the adult Angel Comb. Upon arriving, you’ll find an aggressive Marrowbreach and several Nibbler Mango who’ll persistently attack you if you approach the area. More importantly, you’ll spot Bloom Cankers—small, blue nodes coming out of the Angel Comb’s tentacles—that you’ll need to blast with your Sonic Resonator.
Connected to the adult Angel Comb is two large, purple roots heading out of the cave. Both will lead you to juvenile Angel Combs that are also infected with Bloom Cankers. Clear away the blooms from one before retracing your steps, visiting the second Angel Comb, and disintegrating its blooms.
Upon clearing away every Bloom Canker on all three Angel Combs, the adult comb will flower, revealing its Heat Tolerance Adaptation bulb. Stick your hand inside to receive the adaptation, allowing you to traverse hot temperature waters without any negative repercussions.
The post How to get Heat Tolerance in Subnautica 2 appeared first on Destructoid.
The Tadpole is your best friend when it comes to deep-sea exploration in Subnautica 2, and we can improve it with some extremely useful upgrades. The upgrades come in different shapes and sizes, but they all improve your submarine in one way or another.
You’ll have to find all the upgrade modules manually, and this guide is here to help you out.
Table of contents
How to find all Tadpode upgrades in Subnautica 2
Before I dive deep, you should note that there’s no fixed way to find these upgrade modules. My sequence is the most optimum one, and you’ll save a lot of time.
Scout Ray Chassis location
This is the only upgrade module that’s not located around the Alien Ruins Research Outpost. Instead, you’ll need to head to the Tadpole Pens in the warm area of the ocean. Head inside, and continue on the straight path. You’ll find the Scout Ray in the Moonpool; scan with your scanner, and we are done.
I highly recommend upgrading to the Scout Ray if you’ve th resources. This chassis gives a huge speed bump to your Tadpole, and it will help save a lot of time during the next steps.
Engine Efficiency upgrade location
Head east from your Lifepod and you’ll find the Alien Ruins Research Outpost at approximately 1300m. Head inside, and turn right. You’ll find the Engine Efficiency upgrade module.
Strike Armor upgrade location
From the Research Outpost, travel between 195 and 210 degrees on the compass. You should aim for a depth of approximately 190m (go gradually instead of taking a sharp dive).
You’ll find the platform with the Strike Armor upgrade at around 60m from the outpost.
Cavitation Muffler upgrade location
This is the furthest upgrade module to find. Return to the front of the outpost. Head to deeper depths while aiming at around 75 degrees east on the compass. You’ll come across the above structure in the image (this is the Power Center). Go past the arc shown in the picture, and then past the pillar.
The screen will become greener, and you’ll find a set of colorful alien plants to your right. Keep to your left, and keep going deeper targetting around 350m of depth. At around 370m of depth, you’ll find a platform on the edge of the cliff on the left (it’s extremely close to the early access area boundary).
Here, you’ll find the Cavitation Muffler upgrade. You should return to the Outpost after obtaining this module.
Photovoltaic Charger upgrade location
Head towards 120 degrees on the compass from the outpost. You’ll find the Blackbox – Iso marker that you should use as your guide. Keep a steady depth of 120m and head straight. You’ll come across an Alterra starship wreck. Park your Tadpole and head inside using the door on the left.
Head straight, turn right, and you’ll find a broken door. Repair the door, and head inside. Then turn left and go to the next room. Take the door to the left corner, and you’ll come across the room with the ISO. The module is diagonally opposite to the dining table that has the ISO on it.
Depth Module Mk. I upgrade location
Return to the front of the Research Outpost. Aim at 165 degrees on the compass, and you’ll find the Blackbox – Ruby 2 pop up on your screen. Head to the spot and reach the bottom layer of the location. You can enter through the broken rocks; I entered through a narrow spot on the left (leave your Tadpole), and you’ll find Ruby 2’s black box.
You’ll also find a broken-down Tadpole, with the Depth Module Mk. 1 beside it.
Haul Chassis upgrade locations
To get the Haul Chassis, you’ll need to scan three fragments. The first one is located just by the Depth Module Mk. 1 upgrade. Once done, return to the Research Outpost and head straight targeting between East and 105 degrees on the compass.
Go past the dome of the Power Center (stick strictly to 105 degrees now), and head straight. Keep heading straight, and you’ll reach another Alterra shipwreck at about 200m depth.
The second Haul Chassis part is on a platform to the left.
To find the final one, you can refer to this guide, which states the location of the final Angel Comb. You’ll want to go past the Angel Comb and head straight, following the root until you reach an acidic pool.
Look to your left past the alien structures after entering the pool room, and you’ll find your final chassis part.
Complete the scan, and your Tadpole will now be able to equip the Haul Chassis.
The post All Tadpole upgrade locations in Subnautica 2 and how to find them appeared first on Destructoid.
Recommended Story For You :

Think of it as a GPS system for World of Warcraft

FIFA 2023 ULTIMATE TEAM MILLIONS MADE EASY

Joana's Clssic WotLK 1-80 & Era 1-60 Speed Leveling Guides

Empowering Gamers with the Ultimate Secret Gold Guide

A Practical Guide For Tactical Gaming

Terra Game - Where Adventure Awaits!