There are consequences for your actions in Quarantine Zone: The Last Check, so don’t get trigger-happy the moment you curl your fingers ’round a firearm. Bad food, poor water quality, an airborne virus, and a zombie outbreak are all things to worry about—but not everyone is sick.
It’s down to you to determine where a patient must go; be it to Quarantine, the Survivor Block, or to be liquified. So, here are all Quarantine Zone items you can use in Campaign and Endless mode to help you during your inspections.
Quarantine Zone: The Last Check items, listed
There are eight items in The Last Check that you can manually select via the tool wheel (hold “Q”). All tools are used with left click when equipped. Diagnosing survivors gets increasingly harder the more tools you’re given. No longer are the obvious signs of infection, bloodshot eyes and spotted lungs, enough to send someone into liquidation. Many patients suffer from multiple symptoms that are unknown and must be discovered through sending infected into the Laboratory.
If you’re not sure whether the survivor is infected or simply sick, send them to Quarantine to recheck their symptoms and hopefully discover new ones in the process, so it makes inspections easier. Any signs of infection should be sent to Quarantine, and clear-cut symptoms of the zombie virus should be liquified or harvested at the Lab to expand your diagnostic knowledge.
| Item | Day | Description | Function |
|---|---|---|---|
Thermopulsometer |
Day two | Pulse and temperature can be indicators of infection. Use the thermopulsometer to check a survivor’s vital signs. Sneezing or hiccupping may be signs of an elevated temperature or pulse. | Measures heart rate and temperature. Higher than 41 degrees and/or a pulse of over 180 indicates infection. |
Reflex Hammer |
Day four | Slow and dulled reflexes are symptoms of the virus. Use the reflex hammer to test a survivor’s muscular response. Only use this on the arms or legs. Hitting a survivor on the head or torso will hurt them. A slack jaw may indicate a potential issue with muscular reflexes. | Non-infected will have no reaction to the hammer, while infected will attack you with the arm that didn’t get hit. An aggressive reaction with the correct hand points to sickness or infection. |
Scanner |
Day six | Some symptoms may be hidden under clothing. Use the scanner to examine survivors without undressing them. | Look for bruises, bite marks, and scars to identify signs of infection. |
Stethoscope |
Day nine | The virus can cause respiratory problems. Use the stethoscope to check a survivor’s breathing for any irregularities. High amplitude waves are a telltale sign of infection. If no signs of illness or infection are detected, the black zone will disappear. | Clear lungs mean healthy, while lungs with spots are signs of being sick or infected. Compare breathing on a stethoscope to symptoms list. Always use multiple tools alongside this to determine if the survivor in Quarantine is sick or is turning into a zombie. |
Syringe |
Day 11 | Use the syringe analyzer to extract fluid samples from a survivor to detect and determine an infection. To avoid potential cross-contamination, syringes can only be used once. Supplies are limited. The science division will send you more syringes if you send them survivors during an evacuation. | Send five survivors onto the Science Truck during an evacuation to get one Syringe. This will be the tool you use the least, but will tell you if the survivor is infected if the fluid turns orange. |
Gun |
Day 13 | – | Use on zombies that turn in the Survivor Block or Quarantine (during inspection) so they don’t kill survivors or attack you. Will result in a game over if you shoot other Checkpoint Alpha staff (resets the day). |
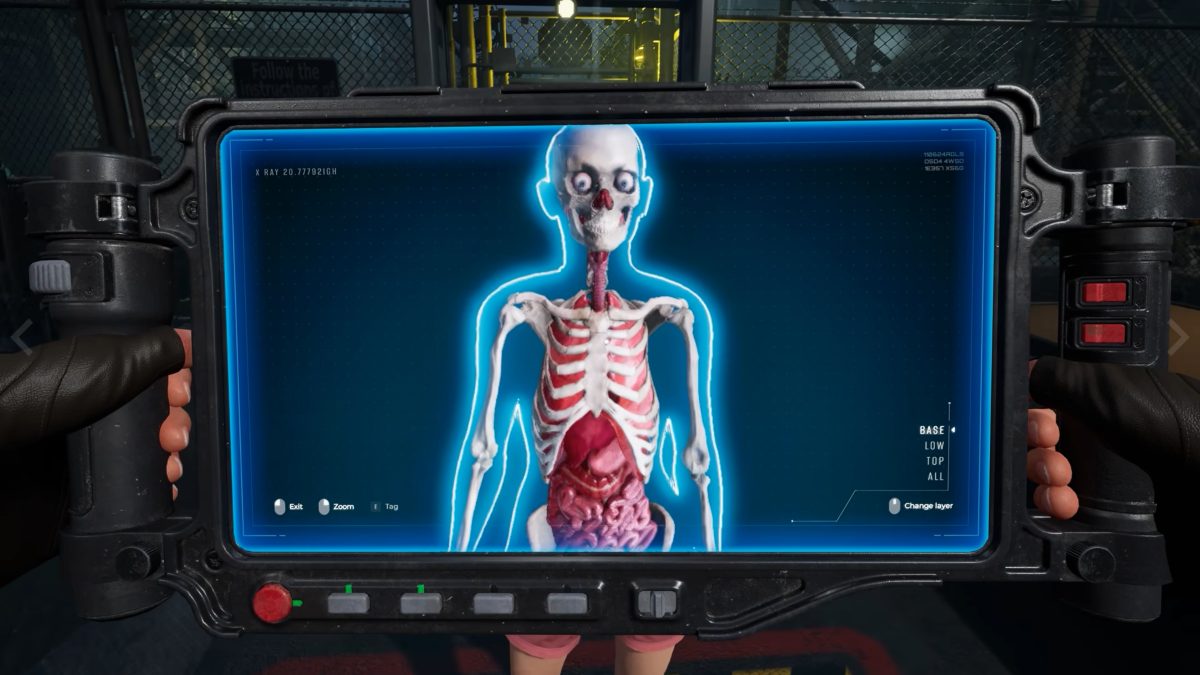
X-Ray |
Day 13 | Use the X-ray to inspect a survivor’s internal organs for signs of infection. As the virus continues to evolve, you will find that not every symptom is skin deep. | Lesions, dark spots, and unnatural coloring appear on organs, showing signs of infection. Filter through layers in the anatomy to find anomalies. |
Matioscope |
Day 16 | A powerful ophthalmological tool for observing the virus. Use the matioscope to zoom in and pan across a survivor’s retina. Certain ocular parasites and anomalies indicate infection. Survivors with drooping eyelids may have potential symptoms that require the matioscope for confirmation. | Look for clear signs of infection with virus and parasitic imagery inside the retina. |
All Quarantine Zone items are automatically provided on the set days listed above as scripted moments and part of the Campaign. You start with all eight tools in Endless mode. While it isn’t on the item wheel, there is the Internal Contraband feature that behaves like an item and is part of inspection. This is accessed via Charlie on Day 15, one of the hazmat-wearing staff on the scene that spawns next to Georgie. Some patients show up with miscellaneous items that they’re trying to smuggle in, at a place where the sun doesn’t shine. This isn’t a mechanic to ignore, as it can protect the survivors inside The Block. So, stay frosty not only to potential zombie infections, but those smugglers cosplaying as a gone wrong Joel Miller.
The post All Quarantine Zone: The Last Check items and how they work appeared first on Destructoid.
The Hi, Doggy quest not only has a funny name, but it’s a rather interesting task to complete in Quarantine Zone: The Last Check.
The Hi, Doggy is a relatively early game quest that you can unlock on day 10. It’s a core campaign quest, so there’s no way of skipping it (unless you’re playing in the Endless mode). This guide will help you figure out how to feed your zombie.
Table of contents
How to start Hi, Doggy quest in Quarantine Zone: The Last Check
The quest begins at the start of day 10 when the major briefs you about what needs to be done. When you’re in the early game, there’s not much you can do with a zombie in Quarantine. However, this quest will introduce you to the Cage in the Laboratory.
The Cage can contain an undead and allow you to study for research. You’ll find the Cage to the right of the main lab tent (from where you can discover new symptoms). Your next task is to feed the zombie. Head straight from the lab gates, and you’ll end up in front of the locked zombie.
How to feed the zombie in Hi, Doggy quest
This task is pretty simple. Go to the Liquidation zone, where you send the infected to be chopped. You’ll find a marked area by the pile of bags. Pick up a body bag, put it on the card, and go back to the laboratory tent. If you can’t pick up the body, chances are that the cart isn’t close enough. Interact with the cart and bring it closer to the body bags.
Park the cart next to the Cage, and interact with the body bag carrying the corpse. Pick it up, and put it in the Cage, and the zombie will start to eat. This will complete the Hi, Doggy quest. Make sure to put the cart in the highlighted zone so that the corpse can be fed to the zombie trapped inside.
The post How to complete Hi, Doggy in Quarantine Zone: The Last Check and feed the zombie appeared first on Destructoid.
Recommended Story For You :

Think of it as a GPS system for World of Warcraft

FIFA 2023 ULTIMATE TEAM MILLIONS MADE EASY

Joana's Clssic WotLK 1-80 & Era 1-60 Speed Leveling Guides

Empowering Gamers with the Ultimate Secret Gold Guide

A Practical Guide For Tactical Gaming

Terra Game - Where Adventure Awaits!