Ultimate Gauntlet 7 is live in FC 26 Ultimate Team, and it’s headlined by a fantastic card that you can obtain for free.
The new Gauntlet is modeled on older versions of the game, but there are a few differences. This guide will help you complete all the tasks and unlock the complete set of rewards.
FC 26 Ultimate Gauntlet 7 guide
The Ultimate Gauntlet 7 has nine tasks in total. All nine tasks have distinct conditions that you have to complete, offering individual rewards.
| Task | How to Complete | Rewards |
|---|---|---|
| Play 1 | Play 1 match in Ultimate Gauntlet 7 | 81+ Rare Gold Players Pack x3 |
| Play 2 | Play 2 matches in Ultimate Gauntlet 7 | 85-87 Rare Gold Player Pack |
| Play 3 | Play 3 matches in Ultimate Gauntlet 7 | 85-89 Rare Gold Player Pack |
| Score in 3 | Score at least 1 goal in 3 separate matches in Ultimate Gauntlet 7 to earn an EVO Consumable | Evo Unlock |
| Score in 5 | Score at least 1 goal in 5 separate matches in Ultimate Gauntlet 7 | 82+ Rare Gold Players Pack x5 |
| Score in 6 | Score at least 1 goal in 6 separate matches in Ultimate Gauntlet 7 to earn an EVO Consumable | Evo Unlock |
| Score in 7 | Score at least 1 goal in 7 separate matches in Ultimate Gauntlet 7 | 82+ Rare Gold Players Pack x10 |
| Score in 9 | Score at least 1 goal in 9 separate matches in Ultimate Gauntlet 7 | 83+ Rare Gold Players Pack x10 |
| Score in 11 | Score at least 1 goal in 11 separate matches in Ultimate Gauntlet 7 | 86+ Rare Gold Players Pack x3 |
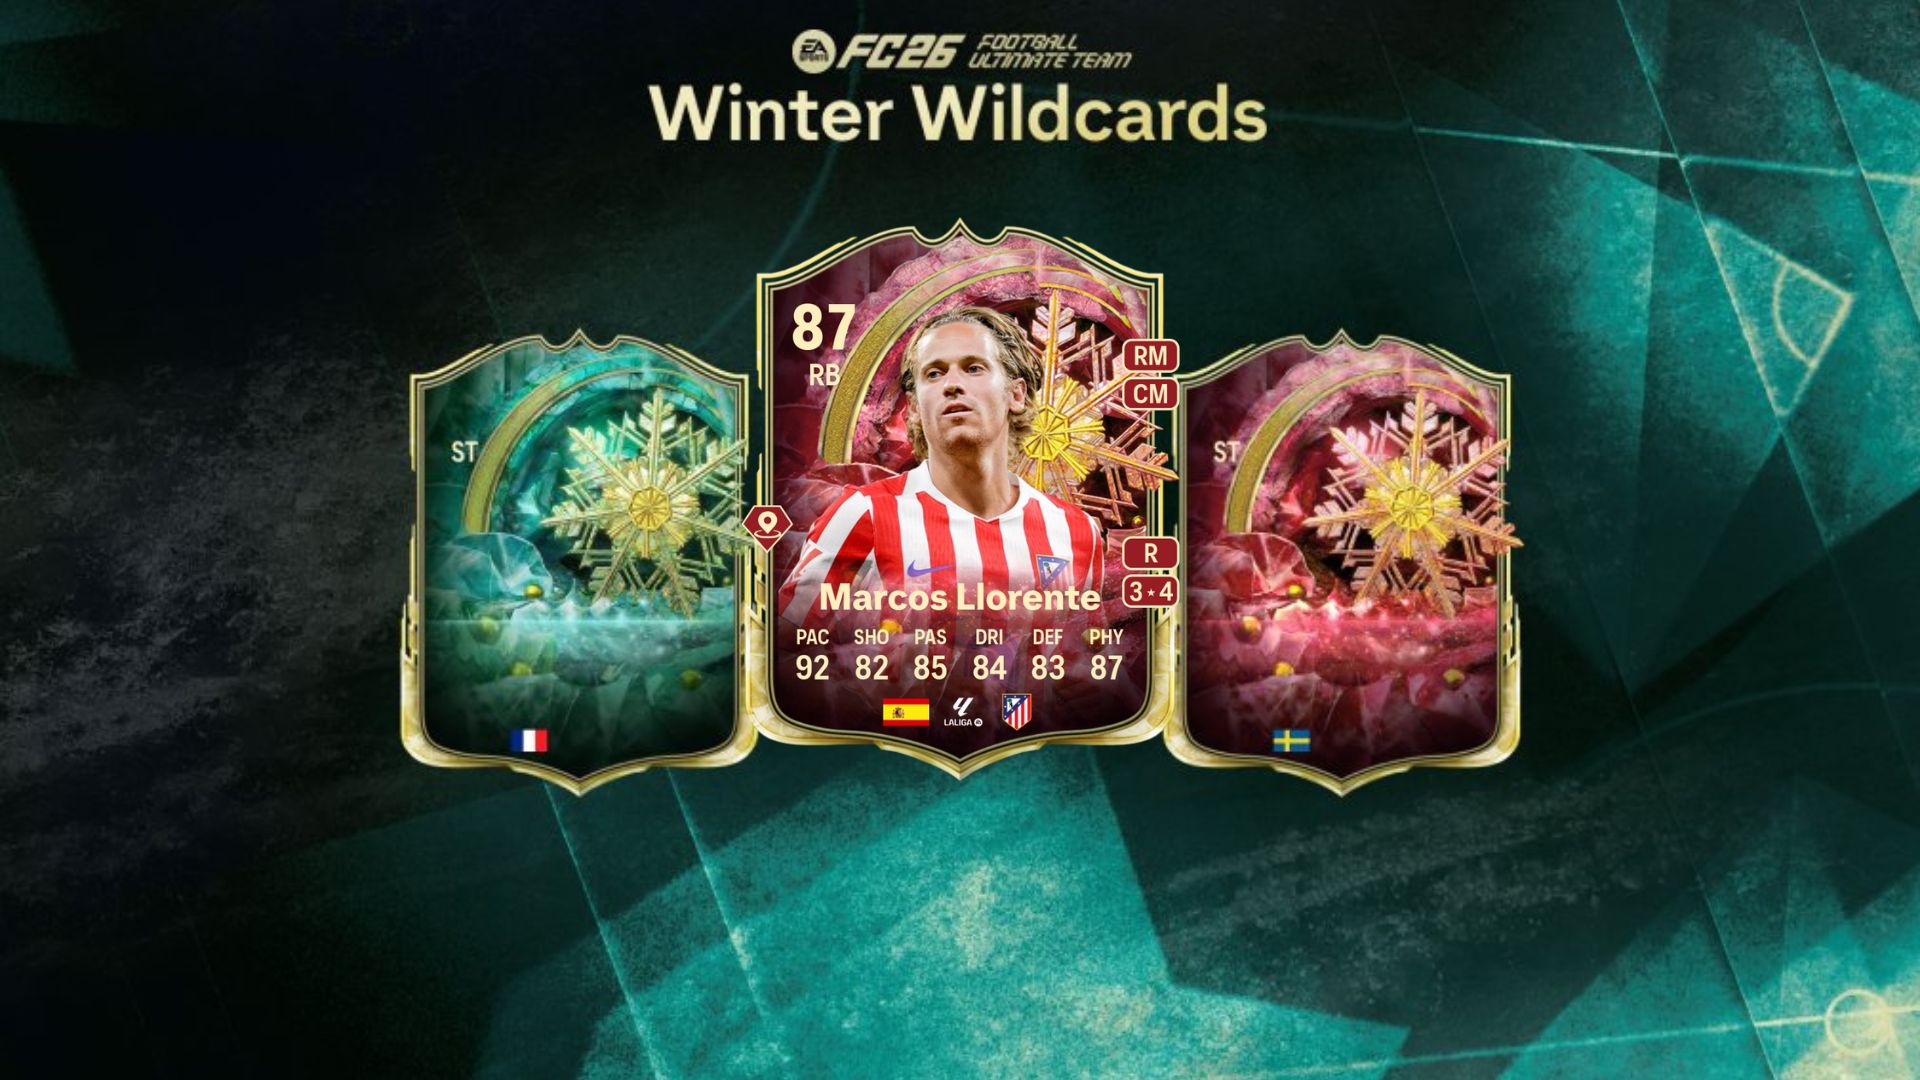
Completing the full set will fetch you the Winter Wildcards Marcos Llorente item for free. This is undoubtedly one of the best items to obtain in Ultimate Team. The 87-rated card has some fantastic stats, playstyles, and roles. He has the stats to dominate multiple positions. Since there’s no task where you need to win a certain number of games, all you have to do is complete the games and make sure to score at least one goal.
The post All FC 26 Ultimate Gauntlet 7 rewards and tasks appeared first on Destructoid.
The Fury (Part 1) is the first of a new questline that’s been added to Avatar Frontiers of Pandora as part of From the Ashes DLC.
Divided into three parts, the quest takes you all across the new region in search of enemies and items. Part 1 begins with So’lek being informed by Teylan that RDA is capturing animals from all over the map. Your task begins with performing a thorough investigation into the situation.
Table of contents
Avatar Frontiers of Pandora The Fury (Part 1) quest walkthrough
The Fury (Part 1) quest can be broken down into four subparts.
- Locate and Investigate the distress signal site
- Return the Stormglider egg
- Go to the Resource Containment Outpost
- Access the control center at Resource Containment Outpost
Locate and Investigate the distress signal site
Your first task is to go to the crash site from where the RDA distress signal was sent from. The quest marker will lead you to the location in Silk Woods. You’ll find a few RDA soldiers to defeat at this location. Investigate the surroundings to find more clues about what ot do next.
Return the Stormglider egg
You’ll receive a Stormglider egg upon completing the previous part of the quest. You’ll have to return it to its nest. The quest marker will lead you to the location. You’ll encounter two adult Stormgliders at the location. They’re the parents, and you’ll have to avoid being seen by them as you place the egg.
Use stealth to go past the Stormgliders and put the egg back in its right location. You’ll then get a message that the RDA is en route to this location. Defeat all the arriving forces to proceed to the next part of the task.
Gp to the Resource Containment Outpost
The next quest marker will take you to the Resource Containment Outpost. Go close and look for a vantage point to examine the facility. To infiltrate, you’ll need to climb a wall and go inside.
Defeat all the forces you find at the outpost and then free the trapped Soundblast Colossus. Further, defeat all incoming soldiers to prevent the animal from being killed. Once done, Teyland will open the gate to the outpost, and the beast will escape.
Access the control center at Resource Containment Outpost
Your last task is to access the control center of the Resource Containment Outpost. This will allow you to open Gate B and then head inside. You’ll find multiple cages, and you have to use your knife to destroy the locks. This will free the captives, and you’ll discover an NPC named Itu. Complete the following dialog set to finish the mission.
The post How to complete The Fury (Part 1) in Avatar Frontiers of Pandora From the Ashes DLC appeared first on Destructoid.
Recommended Story For You :

Think of it as a GPS system for World of Warcraft

FIFA 2023 ULTIMATE TEAM MILLIONS MADE EASY

Joana's Clssic WotLK 1-80 & Era 1-60 Speed Leveling Guides

Empowering Gamers with the Ultimate Secret Gold Guide

A Practical Guide For Tactical Gaming

Terra Game - Where Adventure Awaits!