The lifepod in Subnautica 2 is our way to reach the top, but it will be stuck. When we reach the pod, we will get a message that a pair of clamps is locking it. We will have to manually disable these clamps to make the pod reach the top of the ocean surface, which will allow us to continue our adventures.
How to locate and release the lifepod clamps in Subnautica 2
Once you’ve woken up and completed sampling the Alien DNA in the wrecked ship, you’ll need to make your way to the Black Box. Proceed further from there, and you’ll reach inside the lifepod. This is a safe space that allows you to recharge your oxygen.
When you try to activate and move the lifepod upward, you’ll get the error message. Your next task is to disable the clamps. Unfortunately, this can be an arduous task in the dark, and you can quickly run out of oxygen.
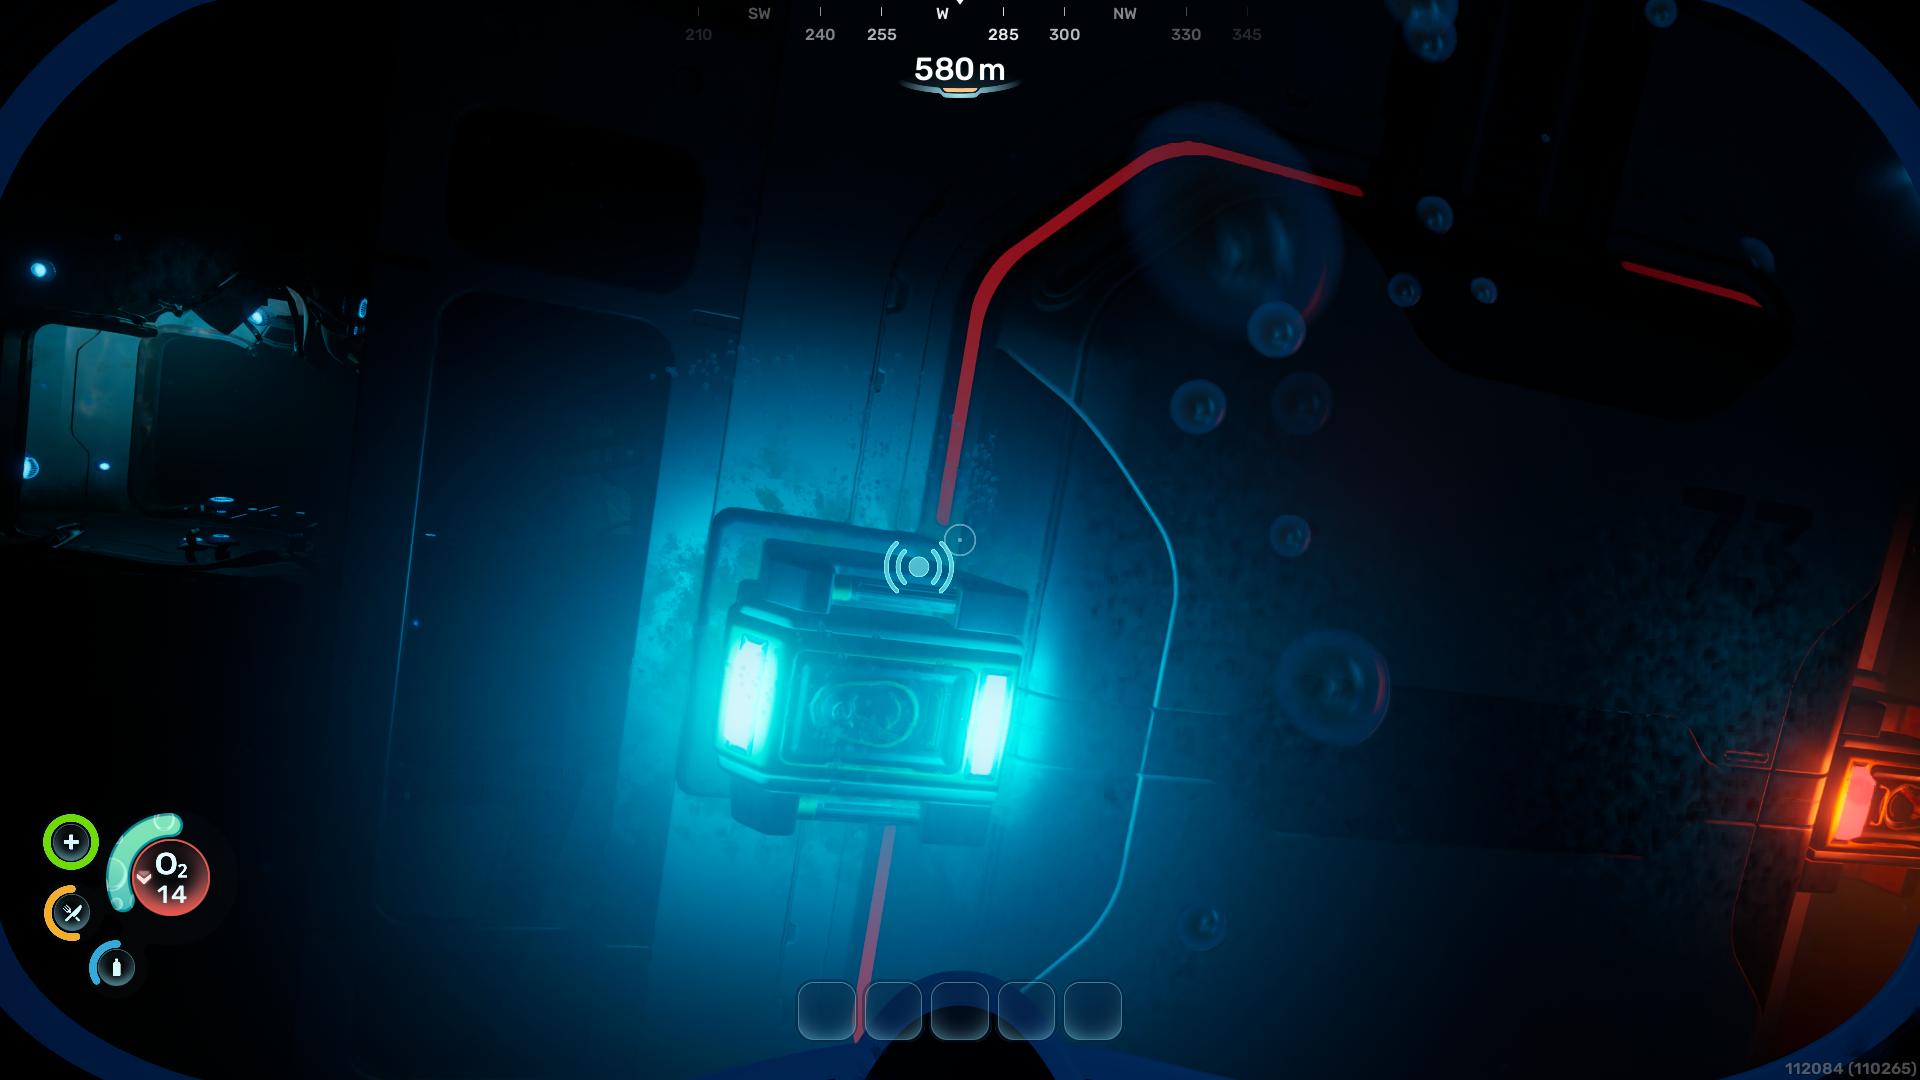
Fortunately, the clamps are located behind the lifepod. Go to any side of the pod, swim forward, and turn right/left. You’ll find two clamps highlighted in amber-shaded light (refer to the image below).
Approach and interact with either of the two clamps to release it. Next, return to the lifepod to refill your oxygen. I tried to activate both together, but didn’t make it back safely. Hence, it’s best to take one clamp at a time. Once your oxygen has been refilled, return to the second clamp. Repeat the process, and both clamps will be released.
Head back inside the lifepod and interact with the portal. This time, you’ll be able to complete the launch, and it will take you to the top of the ocean surface. However, you’ll be unable to return to the prolog area. Hence, only launch the lifepod after you have properly scouted the shipwreck area.
The post How to release the lifepod in Subnautica 2 appeared first on Destructoid.
There are two types of survival game players in the world: those who enjoy the thrill of survival in harsh environments and taking on enemies, and those who relax while building massive bases. Subnautica 2 is no exception, especially with its base-building mechanics changing from the first game.
Table of contents
How to build a base in Subnautica 2
Before you can begin making your first base in Subnautica 2, you’ll need to unlock and craft a Habitat Builder tool. Using this tool, you can access a build menu containing corridors, doors, production machines such as a Fabricator, and miscellaneous decorative items.
Subnautica 2 also offers a small tutorial in the form of a NOA entry within a nearby structure. By traveling 80 meters southeast of the Lifepod, you’ll find a Welcome Center building that’s run out of power. Inserting a basic battery into the Welcome Center’s wall panel will power its Bio Lab and NOA, who’ll give you a rundown of how base building works.
How to unlock the Habitat Builder tool
Unlocking and crafting the Habitat Builder tools requires making a Survival Multitool and Scanner. You can craft the multitool using three titanium, while the scanner uses the following resources:
- Titanium (2)
- Quartz (2)
- Basic Battery (1)
Titanium is the easiest of the required resources to find, as it’s an abundant material you’ll find around your Lifepod. Glass requires two quartz, which you’ll also quickly acquire early on. Basic batteries are slightly trickier, as you’ll need to collect copper from nearby caves.
Your next step after making these tools is to search for two old Habitat Builder tools that you can scan. Here’s a breakdown of two possible locations:
- Head back to the Welcome Center. Next to the “Welcome Center” sign outside of its entrance is a metal box containing a Habitat Builder tool.
- Go inside the building. Dive into the hole in the center of the building’s floor to find the second Habitat Builder tool inside a metal storage container next to the Oxygen Tunic.
Once you have both blueprint components, you’ll unlock the Habitat Builder tool in your Fabricator. You can craft it using the following resources:
- Titanium (2)
- Glass (1)
- Basic Battery (1)
- Copper Wire (1)
Titanium is the easiest of the required resources to find, as it’s an abundant material you’ll find around your Lifepod. Glass requires two quartz, which you’ll also quickly acquire early on. Basic batteries and copper wires are trickier, as you’ll need to collect copper from nearby caves and use your Multitool to break Acid Raion for their pouches.
All base building and furniture blueprints in Subnautica 2
Once you build the Habitat Builder tool, you can access your build menu by holding the tool in your hotbar and pressing the Open Menu key (right-click on PC.) As you collect more resources and scan furniture you encounter around the map.
Here’s a complete list of every base-building component and furniture items you can build in Subnautica 2:
Base Pieces
| Recipe | Ingredients |
|---|---|
| Corridor | Titanium (2) |
| Room | Titanium (5) |
| Hatch | Titanium (1) Quartz (1) |
| Window | Glass (1) |
| Nook | Titanium (3) Glass (2) |
| Half Round Room | Titanium (5) Glass (5) |
| Moonpool | Titanium (5) |
Furniture
| Recipe | Ingredients |
|---|---|
| Dining Chair | Titanium (2) |
| LabChair | Titanium (2) |
| Stool | Titanium (1) Rubber (1) |
| Dining Table | Titanium (3) Glass (1) |
| Single Bed | Titanium (2) Fiber (3) |
| S Shelf | Titanium (2) |
| Trashcan | Titanium (2) |
| Small Crate | Titanium (1) |
| Sign | Titanium (1) Copper (1) |
| Reaper Leviathan | Titanium (1) |
Plantables
| Recipe | Ingredients |
|---|---|
| Pent | Pent (1) |
| Macaron Sponge | Fibrous Pulp (3) |
| Mimic Pylon | Fibrous Pulp (5) Copper (4) |
| Freesia Flower | Fibrous Pulp (3) |
| Acid Raion | Medical Gel Sac (1) |
| Cradle Shootroot | Lucifer Rotsac (1) |
| Necrolei Cyst | Necrolei Cyst (1) |
| Cherimoya Rotsac | Cherimoya Rotsac (1) |
Power
| Recipe | Ingredients |
|---|---|
| Solar Panel | Titanium (1) Quartz (2) |
| Hydroelectric Turbine | Titanium (3) Copper (3) Silver (3) |
| Thermal Plant | Titanium (3) Copper (3) Gold (3) |
| Power Transmitter | Titanium (1) Copper (1) |
Production
| Recipe | Ingredients |
|---|---|
| Fabricator | Titanium (1) Copper (1) Quartz (1) |
| Processor | Titanium (2) Mild Acid (1) Copper Wire (1) |
| Biolab | Titanium (3) Copper Wire (1) Mild Acid (1) |
| Modification Station | Titanium (2) Celestine (2) Copper (2) |
Divisional
| Recipe | Ingredients |
|---|---|
| Interior Wall | Titanium (2) |
| Interior Arch | Titanium (1) |
| Interior Door | Titanium (3) Glass (1) Copper Wire (1) |
| Ladder | Titanium (2) |
Lighting
| Recipe | Ingredients |
|---|---|
| Exterior Wall Light | Titanium (1) Copper (1) |
| Spotlight | Titanium (1) Copper (2) |
Storage
| Recipe | Ingredients |
|---|---|
| Wall Locker | Titanium (2) |
| Floor Locker | Titanium (3) Quartz (1) |
| Tailing Chest | Titanium (3) |
| Wall Rack | Titanium (1) Copper (1) |
Tailing Furniture
| Recipe | Ingredients |
|---|---|
| Tailing Table | Titanium (2) |
| Tailing Drum | Titanium (2) Fiber Mesh (2) |
| Tailing Barrel | Titanium (2) |
| Coral Jar | Coral Shavings (2) |
| Small Coral Jar | Coral Shavings (1) |
| Tailing Jar | Fiber (1) Salt (1) |
| Hanging Tailing Jar | Fiber (2) Salt (1) |
| Tailing Rug | Fiber (3) |
Axum Furniture
| Recipe | Ingredients |
|---|---|
| Small Axum Jar | Glass (1) Copper (1) |
| Axum Jar | Glass (1) Copper (2) |
| Tall Axum Jar | Glass (1) Copper (3) |
Utility
| Recipe | Ingredients |
|---|---|
| Habitat Beacon | Titanium (1) |
Lighting
| Recipe | Ingredients |
|---|---|
| Small Ceiling Light | Titanium (1) Copper (1) |
| Rectangular Ceiling Light | Titanium (2) Copper (1) |
| Wall Light Small | Titanium (1) Copper (1) |
| Wall Light Large | Titanium (2) Copper (1) |
| Axum Wall Lamp | Celestine (1) Titanium (1) |
Posters
| Recipe | Ingredients |
|---|---|
| Keep Calm Poster | Titanium (1) |
| Just Keep Swimming Poster | Titanium (1) |
| Safety First Poster | Titanium (1) |
| Scout Ray Poster | Titanium (1) |
| Zezura Poster | Titanium (1) |
| New Life Poster | Titanium (1) |
| Painted Tree Poster | Titanium (1) |
| Pioneer Program Poster | Titanium (1) |
| CHBC Live Poster | Titanium (1) |
| Lost River Poster | Titanium (1) |
Power
| Recipe | Ingredients |
|---|---|
| Battery Terminal | Titanium (2) Quartz (2) Copper Wire (1) |
| Power Cell Terminal | Titanium (3) Copper (3) Wiring Kit (1) |
| Bioreactor | Titanium Ingot (2) Copper Ingot (2) |
| Power Storage | Germanium Ingot (1) Titanium (3) Salt (2) |
Decorations
| Recipe | Ingredients |
|---|---|
| Wall Unit Small | Titanium (1) |
| Wall Panel | Titanium (1) |
| Wall Unit Large | Titanium (3) |
| Wall Vent | Titanium (2) |
| Wall Vent Large | Titanium (3) |
Habitat Systems
| Recipe | Ingredients |
|---|---|
| Biobed | Titanium (3) Glass (1) Copper Wire (1) |
| NOA Terminal | Titanium (3) Glass (1) Copper Wire (1) |
| Scanner Station | Titanium (3) System Chip (1) Wiring Kit (1) |
| Time of Day Display | Titanium (1) Copper (1) Enameled Glass (1) |
Utility
| Recipe | Ingredients |
|---|---|
| Portable Locker | Titanium (4) |
| Beacon | Copper (1) Titanium (1) |
| Portable Oxygen Generator | Titanium (3) Lithium (2) |
| Work Light | Titanium (3) Quartz (2) |
| Dive Elevator | Titanium (4) Copper (2) Quartz (2) |
Exterior Decorations
| Recipe | Ingredients |
|---|---|
| Roof Pmp | Titanium (1) |
| Roof Pump Double | Titanium (2) |
| Roof Cylinder | Titanium (1) |
| Roof Panel Large | Titanium (2) |
| Roof Antenna | Titanium (1) |
| Roof Antenna Large | Titanium (3) |
| Roof Listening Dish | Titanium (3) |
If you’d like to learn more about the game’s crafting recipes, check out our complete Subnautica 2 blueprint list, or click the tags below to explore our growing guide collection.
The post How to unlock base building in Subnautica 2 appeared first on Destructoid.
Recommended Story For You :

Think of it as a GPS system for World of Warcraft

FIFA 2023 ULTIMATE TEAM MILLIONS MADE EASY

Joana's Clssic WotLK 1-80 & Era 1-60 Speed Leveling Guides

Empowering Gamers with the Ultimate Secret Gold Guide

A Practical Guide For Tactical Gaming

Terra Game - Where Adventure Awaits!